
- Published on
Multi-Factor Authentication: Behind the scenes
Ever wondered why more and more services and apps are advocating the use of 2 Factor Authentication? You know, that account security feature where it sends a code to your phone after you enter your password. How does it even work? In today’s article, I will be describing MFA (Multi-Factor Authentication) and its core algorithm in laymen terms, as well as how to implement it in your own backend systems.
Security Benefits
2FA acts as a second layer of protection to your online accounts. Usually, for a higher degree of security, it incorporates a physical item that’s in your possession, essentially ensuring that only you may get past this barrier. For example, it could be using SMS to text the secret code or using a TOTP app such as Google Authenticator.
The main benefit of this layered defense is that it significantly makes it harder for an unauthorized attacker to gain access to your account in the event of a password breach or leak, acting like a damage minimizer.
The US national security statistics indicates that MFA can prevent 80-90% of cyber attacks. It even prevented 99.9% of all automated cyber assaults on Microsoft’s platforms and services. It just goes to show how simple yet ridiculously effective this system really is, and why you should implement it in your own apps as well!
Of course, there are some cons to this like everything, although arguably few. The main thing to note is that if the user does not have the backup security keys and loses access to the verification element (e.g. phone), they may get locked out of the account.
Factor Methods
To be more specific, the phone method is not actually the only way, although it is one of the most common. It can be something you know, something you have, or something you are. I’ll briefly describe each one respectively.
Knowledge Factor
With this method, the application requests you to enter a piece of hidden information that only the real would know. This can be in the form of PINs, answers to secret questions, passphrases, etc. As mentioned previously, two popular approaches include SMS and TOTP authenticators.
SMS, which is inherently unencrypted, is trivially easy to hijack. Hackers can exploit weaknesses in the cellular network to intercept text messages, as demonstrated by Positive Technologies security researches, when they successfully hacked into Coinbase bitcoin wallets using this approach. Text messages are vulnerable to a host of other common attacks like phishing and spoofing as well. For this reason, I will be honing in on the TOTP-based method for the rest of the article.
TOTP Authenticator
Before we move on, I would like to take a moment to quickly introduce or refresh your mind on what I mean when referring to TOTP. It stands for Time-based One-Time Passwords — unique numeric passwords that are generated by an offline algorithm that makes use of the current time as an input. This code is what is displayed when you open an app like Google Authenticator.
Possession Factor
This is essentially like a real life, physical key to a lock, and can be in the form of card readers, wireless tags, USB tokens, etc. These require direct input (physical contact) to grant the user authentication. Interestingly enough, TOTP can be viewed as a mixture between the knowledge and possession factors.
Inherence Factor
The inherence factor usually requires metrics that only the authorized individuals innately own — biometrics being the most common type. This method employs tools that can verify these biometrics, like retina scanners, voice recognition software, fingerprint readers, and more.
Core Algorithm
Now with the background information aside, let’s dig into how TOTP works from a system design perspective.
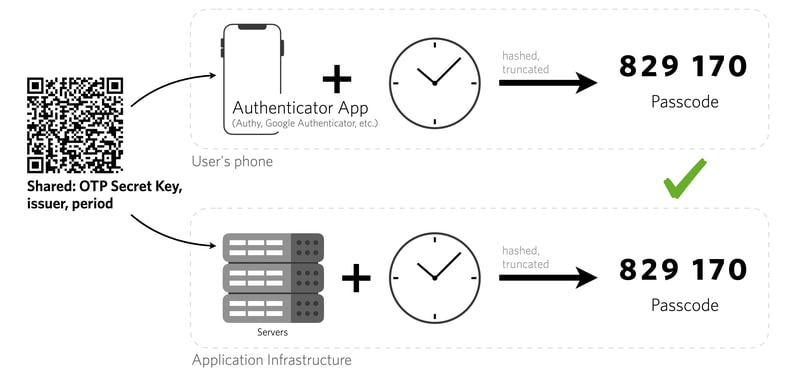
- A secret key is created on the backend and associated with that particular user in the database.
- When the user scans the QR Code, the secret key is the transmitted over to the authenticator app.
- The app creates a code which expires at the end of every interval using the counter (time) and secret key.
- The user types this code into our web application and we verify if this code is correct, based on the secret key associated with that user and current counter (time).
- If the code is valid, access is granted successfully!
HOTP and TOTP
How are these mysterious one time codes generated securely to begin with? That’s where HOTP (HMAC-Based One-Time Password) comes in.
First, it creates an HMAC hash from the previously mentioned secret key and counter, with a 20 byte output string. For those that don’t know what HMAC is, it is a cryptographic technique that can verify if the data is correct and authentic using shared secrets as opposed to asymmetric cryptography.
hmac = hmac_sha_1(secret, counter) # 20 byte string
Obviously, a user cannot enter such a long string, so we need to condense this into something more user friendly using the following bit twiddling:
offset = hmac[19] & 0xf # hmac[19] = 19th byte
hotp = (hmac[offset++] & 0x7f) << 24 |
       (hmac[offset++] & 0xff) << 16 |
       (hmac[offset++] & 0xff) << 8 |
       (hmac[offset++] & 0xff);
Let’s break this wizardry down. The offset is the last 4 bits of the last byte — hmac[19]. For example, if the last byte is 0xf6, we start from byte hmac[6] and concatenate it with hmac[7], hmac[8], and hmac[9] bytes. That’s all this is doing.
All we need now is to convert to decimal (which usually is done implicitly) and fetch the last NUM_DIGITS from the resulting 4 byte hotp using the modulo operator.
hotp %= 10 ^ NUM_DIGITS
Now we can generate a 6 digit code securely from a secret and counter! However, notice how we need to make sure to update the counter and keep track of it, for it to truly be a one time password. TOTP eliminates this by replacing the counter with time. We can use the unix timestamp as the counter and divide it by the INTERVAL, the number of seconds before changing the code.
Node.js Implementation
Let’s create an express and mongodb backend to demonstrate how you can use MFA in your applications. The API will include the following routes:
/registerAccepts a username and password and creates a new user in the database./loginAccepts a username and password and temporarily logs in the user to complete the OTP process./create-otpInitializes a new TOTP secret for the user/qrcodeReturns a qrcode for the user to scan in their OTP app/otp-verifyAccepts a 6 digit token and validates it using the TOTP algorithm. If correct, then full authorization is granted.
We will also be using the following libraries and tools:
expressRobust http server frameworkexpress-async-errorsAsync wrapper for express to automatically callnext()on errors
corsEnable CORS support for expressmongooseMongoDB ODMdotenvLoad environmental variables from.envfileotplibCore OTP algorithm libraryargon2Secure password hashingjsonwebtokenTo create JWT tokensqrcodeEncodes data into QR codes
Open up a terminal and setup a new project:
mkdir otp-demo
yarn init -y
touch main.js .env
yarn add express express-async-errors cors mongoose dotenv otplib argon2 jsonwebtoken qrcode
yarn add -D nodemon
Set the port, JWT secret, and mongo URI environmental variables in the .env file:
PORT=8080
JWT_SECRET=secret
DB=mongodb://127.0.0.1:27017/otp-demo
To begin with, let’s import all of our dependencies in the main.js:
require("dotenv").config()
const express = require("express")
require("express-async-errors")
const cors = require("cors")
const mongoose = require("mongoose")
const argon2 = require("argon2")
const jwt = require("jsonwebtoken")
const qrcode = require("qrcode")
const { authenticator } = require("otplib")
Then, we will import the environmental variables:
const { PORT = 8080, DB, JWT_SECRET } = process.env
Now, let’s connect mongoose to our Mongo DB database and setup the User model. Note that the model also contains an mfaSecret property, since we are storing the OTP secret for each user.
mongoose.connect = mongoose.connect(DB, {
    useNewUrlParser: true,
    useUnifiedTopology: true,
})

const User = mongoose.model(
    "User",
    new mongoose.Schema({
        username: { type: String, unique: true, required: true },
        password: { type: String, required: true },
        mfaSecret: { type: String },
    })
)
Initializing the express server with cors and bodyparser:
const app = express()
app.use(cors())
app.use(express.json())
We are going to create some authentication middleware utilities to parse the Bearer JWT token and decode the payload into the request. We have to create a separate middleware called strictAuthOnly because there is a distinction between the JWT token received from /login and /otp-verify — the former being temporary only so that 2FA may take place. Make sure to use strictAuthOnly to protect all other non-otp related user-specific routes.
// allows both unauthorized and authorized tokens
const authOnly = async (req, res, next) => {
    const { authorization } = req.headers
    const token = authorization.split(" ")[1]
    const payload = jwt.verify(token, JWT_SECRET)
    req.user = payload
    next()
}

// only allows authorized tokens
const strictAuthOnly = async (req, res, next) => {
    const { authorized } = req.user
    if (authorized) next()
    else throw new Error("unauthorized")
}
In the register route, we hash the provided password and store the user in our database. For simplicity’s sake, we won’t be including code for security and validation.
app.post("/register", async (req, res) => {
    const { username, password } = req.body
    const hash = await argon2.hash(password)
    const user = await User.create({ username, password: hash })
    res.json(user)
})
In the login method, we find the user based on the unique username and verify if the hash of the provided password is equal to the hashed password in the database. If successful, we will return a temporary JWT that can only be used for OTP routes.
app.post("/login", async (req, res) => {
    const { username, password } = req.body
    const foundUser = await User.findOne({ username })
    if (foundUser && (await argon2.verify(foundUser.password, password))) {
        res.json({
            token: jwt.sign(
                { username: username, authorized: false },
                JWT_SECRET
            ),
        })
    } else throw new Error("invalid credentials")
})
Then, in the create OTP route, we generate a secret using otplib and associate it with the user.
app.post("/create-otp", authOnly, async (req, res) => {
    const { username } = req.user
    const mfaSecret = authenticator.generateSecret()
    await User.findOneAndUpdate({ username }, { mfaSecret })
    res.json({
        ok: true,
    })
})
Based on the OTP secret and additional metadata, we can generate a QR code for the user to scan from their app. It returns a data URL that can directly be included in an <img> tag.
app.get("/qrcode", authOnly, async (req, res) => {
    const { username } = req.user
    const { mfaSecret } = await User.findOne({ username })
    const otp = authenticator.keyuri(username, "OTP Demo", mfaSecret)
    const imageUrl = await qrcode.toDataURL(otp)
    res.json({ imageUrl })
})
Now, in the OTP verification step, we find the OTP secret for the user and use it to validate the token that the user entered. Once validated, we can then proceed to return a complete JWT that can be used for all authenticated routes.
app.post("/otp-verify", authOnly, async (req, res) => {
    const { token } = req.body
    const { username } = req.user
    const user = await User.findOne({ username })
    if (authenticator.check(token, user.mfaSecret)) {
        res.json({
            token: jwt.sign(
                { username: username, authorized: true },
                JWT_SECRET
            ),
        })
    } else throw new Error("invalid token")
})
Finally, let’s create a simple error handler and start the API server.
app.use((err, req, res, next) => {
    res.status(500).json({ err: err.message })
    next()
})

app.listen(PORT, () => console.log(`Listening on port ${PORT}`))
Wrapping Up
Congratulations! You have just written a basic JWT authentication system with 2 factor authentication workflow, with a strong theoretical understanding of TOTP. I hope you guys enjoyed this post on 2FA. Let me know if I missed anything or if you have a cool idea for another blog article!