
- Published on
Scripting automated backups for Linux homelabs using Restic
I can’t count how many times I’ve deleted files that I thought were no longer important, only to find myself searching for them years later. Reading about other people’s horrifying data loss stories motivated me to make it a priority to have a solid backup solution in place.
If you're interested in hearing about how I configured a reliable and centralized backup setup to keep all of my data safe and secure, grab a cup of coffee and read on!
Infrastructure
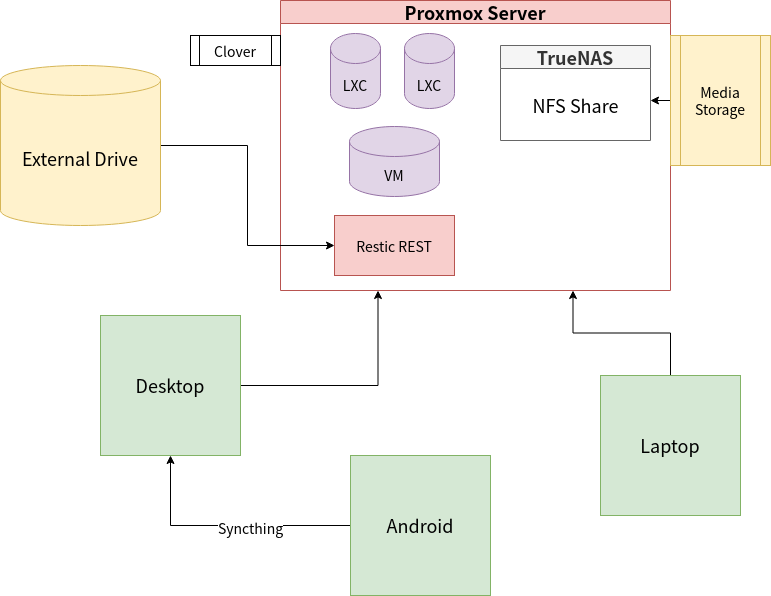
For a long time, I’ve been on the search for a perfect backup solution that encompasses all of my most important systems that are part of my homelab:
- Laptop - Arch Linux
- Desktop - Arch Linux
- Server - Proxmox (Debian)
- TrueNAS, which exposes an NFS share for all of my storage
- LXC containers
- Virtual Machines
- Mobile - Android
I was looking for a solution that could back up each system’s entire configuration, package list, important data files, special keys, directory skeleton, and more.
Furthermore, I wanted all of this to be centralized in my server into an external hard drive, completely automated through Cron, while adhering to industry standard backup strategies like 3-2-1 (further info below).
With all of these requirements, it’s no wonder I put off this behemoth of a task for so long!
Here's an overview of the infrastructure in a diagram:
Backup Tools
I’ve experimented with several backup tools such as timeshift, rsync, and even plain old tar. Timeshift was slightly inflexible for my needs, while tar and rsync were rather barebones for my liking.
The main features I had in mind were incremental backups, restoration, deduplication, compression, encryption and integrity, cloud integration (maybe with rclone), and CLI automation.
Thankfully, I came across Restic, which simply left me flabbergasted as it met every requirement in my wishlist on top of being easy to use! It’s a backup tool similar to borg, but allows multiple systems to use the same repository, in which de-duplication clearly reveals its power.
It also has several backends, including a self-hosted REST server, which I immediately noticed I could leverage to centralize a backup repository.
RAID is not a backup
Before going into the crux of restic and scripting, I'd like to make it clear that RAID cannot be classified as a backup. Its redundancy only provides protection against drive failures, and allow you to rebuild data from additional drives.
It doesn't guard against accidental deletions, physical disasters, or malware. A real backup solution means creating copies on different mediums and locations!
However, I still recommend using and configuring ZFS (software raid) as the fundamental component of your data storage system. It still provides some invaluable protection against data corruption with its data integrity checks, and even automatically repairs itself. On my server, ECC ram further enhances this when ZFS caches files into RAM.
3-2-1 Backup Strategy
Simply put, it's a concrete system for taking backups that ensures backup security and redundancy. When backing up while following 3-2-1, you should create 2 additional copies of your original data:
- One copy should be stored on the cloud or just offsite in a different physical location. It's not paranoid to be vigilant against natural disasters!
- The other copy can be on a hard drive (preferably external) for quick restoration.
This guide describes a backup process that follows this strategy.
Syncthing
I have a few miscellaneous backup cases that I'd like to encompass in my backup process:
- Bitwarden Vault: Contains all of my passwords.
- Aegis Vault: TOTP tokens for 2FA-enabled services.
- Package lists: List of all explicitly installed packages on every system. Useful for reinstalling.
- Photos: Camera roll, saved images from apps, screenshots, etc. I don't trust Google.
Syncthing is my tool of choice for synchronizing this data to my computer, which will later be picked up by Restic. It's open source, encrypts communication, and currently self-hosted on my server. Free from the eyes of big tech!
Give it a try, it's quite easy to configure and set-up on your devices.
Arch Linux Backup Script
On my computer and laptop, the following script is used to trigger a full root system backup.
- Save explicitly installed packages list, including Android's
- Perform restic backup of the entire root partition over REST server. Exclude certain unnecessary directories like trash, cache, etc.
I have DEVICE_TYPE set to either pc or laptop, which will be used to tag the backups for convenient searching.
set -e

DEVICE_TYPE=pc # or laptop
PACKAGE_DEST=$HOME/programs
REST_PORT=8000
REST_IP="192.168.1.77"

# save package list
pacman -Qe > $PACKAGE_DEST/packages

# save android package list
adb connect 192.168.1.190
adb shell pm list packages -3 -U | \
			grep -E uid | cut -d ':' -f 2 | \
		  cut -d ' ' -f 1 > $PACKAGE_DEST/android_packages

sudo restic -r rest:http://$REST_IP:$REST_PORT backup \
            --password-file $HOME/bin/restic_password \
            --tag $DEVICE_TYPE --exclude-file=$HOME/bin/backup_excludes \
            /home /etc
To create the root-only read-protected password file, use the following commands:
echo "PASSWORD" > restic_password
sudo chmod 600 restic_password
sudo chown root:root restic_password
backup_excludes is a file with a list of paths that should be exempt from backing up. This could be things like cache, trash, and node modules.
I was mainly interested in backing up /home and /etc because the rest of the directories are mostly reproduced automatically on a new install.
Proxmox Script
Proxmox has its own automated backup workflow for container/VM snapshots. Although you can set it up in the admin portal, I've integrated this within my main server backup script covered below.
Then, I installed the restic REST server on my server and setup the repository on a mounted external drive. It can be launched with the following script:
mount -U "bd854456-6953-421f-9c0c-d657f63d78b0" /media/restic
/root/restic-server/rest-server --no-auth --path /media/restic/restic
For the actual backup job, I've created a backup.sh script that saves:
- Proxmox and TrueNAS configuration files
- Clover boot files
- Directory skeleton of NFS share
- Snapshots of all containers and VMs
#!/bin/bash

set -e

NFS_SHARE=/media/media
BACKUP_PATH=$NFS_SHARE/backup
CLOVER_PATH=/media/clover
RESTIC_MOUNT=/media/restic
TMP_NAS_DUMP=/root/dump
# backup important /etc proxmox files
PVE_BACKUP_SET=(/etc/pve /etc/network/interfaces /etc/sysctl.conf /etc/resolv.conf /etc/hosts /etc/hostname /etc/cron*)

# clean up old backup data
rm -rf $BACKUP_PATH/dump
rm -rf $BACKUP_PATH/nas
rm -rf $BACKUP_PATH/storage-structure

# create directories if not exist
mkdir -p $CLOVER_PATH $RESTIC_MOUNT $TMP_NAS_DUMP $BACKUP_PATH/dump

# truenas config backup
curl --no-progress-meter \
    -X 'POST' \
    'http://nas.comfy.box/api/v2.0/config/save' \
    -H 'Authorization: Bearer 1-ZXmAznjUdM2yCZtMqsMUsiJtNNun5EAL7og1K4sakyjrVtMhOArZvY2xa0fY4JjW' \
    -H 'accept: */*' \
    -H 'Content-Type: application/json' \
    -d '{}' \
    --create-dirs \
    --output "$BACKUP_PATH/nas/truenas.db"

# backup media storage skeleton
rsync -a --include '*/' --exclude '*' "$NFS_SHARE" "$BACKUP_PATH/storage-structure"

# mount clover
mount -U "5B49-503C" $CLOVER_PATH

# specially backup truenas into temp dir because the vm itself is an NFS host
# causes unrecoverable hangs without this
vzdump 101 --mode stop --dumpdir $TMP_NAS_DUMP
# to wait for nfs is available
until pvesm nfsscan 192.168.1.194 | grep "/mnt/pool/media"
do
    echo "Waiting for NFS..."
    sleep 5s
done
# extra time just in case mounting takes a bit more time than usual
sleep 5s

mv $TMP_NAS_DUMP $BACKUP_PATH/nas/vm-dump

# backup the rest of the containers/vms
vzdump --mode stop --dumpdir $BACKUP_PATH/dump  --exclude 101

restic -r $RESTIC_MOUNT/restic backup --tag server "${PVE_BACKUP_SET[@]}" $CLOVER_PATH $BACKUP_PATH

# clean up
umount $CLOVER_PATH
As my R720 doesn't support NVME boot loading, I use Clover, the initial bootloader used to start Proxmox, which uses its own bootloader (GRUB). I simply backup my clover boot files for convenience, in case I have to set-up my R720 from scratch again.
Backing up my TrueNAS VM is a bit tricky, considering it hosts the NFS share where the backups are stored, and Proxmox powers off nodes in order to reliably back them up. This causes the NFS server to go down, and Proxmox hangs while trying to access the share.
In my script, I've handled this issue by specially backing up the VM into a directory on the Proxmox host first, and then copying it over inside NFS after it's back up. To check the status of the NFS server, I used the PVE storage manager utility.
Next Steps
You can take the automation one step further and have them automatically run every month using Cron. Personally, I prefer overseeing the process with a sense of control, so I stick to manually triggering these jobs (one command away).
Admittedly, I am still on the search for a reliable and affordable cloud storage service for storing a copy of these backups. Backblaze B2 seems to be the most promising out of the options I've considered.
For the time being, I've opted to use another external drive stored inside a bank locker. Every 6 months, I mirror the original and up-to-date backup drive to this off-site copy using rsync. It's been working great so far, but I plan on looking into B2 in the future for a more streamlined setup.
Conclusion
If you have multiple devices and are looking to get started with configuring a hassle-free mostly-automated backup strategy, Restic and bash scripting are your two best friends.
This article was mostly a documentation of a backup workflow that works mainly for my specific setup. Regardless, I hope it serves as a valuable point of reference for creating your own Linux backup scripts.
As always, happy hacking!